f The Bugbytes: August 2011

Welcome - Copyright & Disclaimer

Welcome to The Bug Bytes a site/blog mainly for Papercrafting and some photography and other stuff thrown in here & there. Add in some die cutting machine, scrapbooking tools, cameras, scissors , glue and...... My name is Pam. If you have been redirected from Papillon Digital Design you have come to the right place.Hope you get inspired by the projects, videos and files. Would love it if you could leave comments and become a follower. (Word verification is turned ON to avoid spam. Sorry for that inconvenience.) Would love it if you would also share your project here . If you find a linky under the post do share your project by posting link there or if you do not find a linky post your link in the comments.Thank you for visiting. The website Papillon digital designs has changed to Papillon Digital Design so if the link gives and error or takes you to page with chinese characters then please drop the 's' in the link at the end of papillondigitaldesigns and try . That is change papillondigitaldesigns to papillondigitaldesign and try the link.

August 31, 2011

Flower Foiled!

"Flower Foiled" , " Foiled Flower" or Flower with Foil  :) . Hmm.. last one actually describes what I made but not so catchy as the 1st phrase is it?
So I have got this roll of aluminium foil tape from Home Depot. Since I have not been crafting much I thought I would go up and play to calm myself. Make a craft for the day. And this was the result of my play. Of course this is just the first attempt but I rather liked it. Will do a video of it soon.


Close up


The trick to the process is not removing the adhesive backing too soon!
I took a tape and cuttlebugged it. Take care while choosing a folder as the new large folders do not go sideways inside the cuttlebug. You need an opening to feed the long tape through as you keep moving the tape to cuttlebug on a different part. But I wanted this design and it was on the big folder! So I took a craft knife and slit part of the folder near the joints to allow tape to feed through! If you do not want to cut your folder choose a smaller folder! Or skip cuttlebugging altogether :)
Well then I punched a 1 or 1 &1/2" circle (just grabbed the nearest approx sized punch :) ).
Now DO NOT REMOVE THE BACKING ALL THE WAY! DO NOT or you'll end up with a mess!
just remove a little bit at a time allowing the brown paper to fall behind. ( I do not know how to describe this but if I hold the tape with both hands - cupped ie hands in O shape I use the last 3 fingers to unfold the backing as I go - Hope that made any sense but it is so difficult to describe). Fold/Frill one fold and then remove a little more. I got a bit messy towards the end as I removed lots of backing before I tucked it in.  Then i punched a 1" circle of the remaining foil to adhere on the top to cover the middle. Took some alcohol ink - I think ranger's butterscotch! and dabbed it on with a felt strip/piece. Took a button - cut off the shank and popped it on top with glue dot and voila! a flower to embellish a card or layout with! Hope you liked this and can't wait to try your own. You can also use regular foil and maybe punch out some shapes, optionally cuttlebug them and then glue them and stack them! Play with foils! I have some soda cans too which I want to emboss with my knk.


post signature

Flower Foiled!

"Flower Foiled" , " Foiled Flower" or Flower with Foil  :) . Hmm.. last one actually describes what I made but not so catchy as the 1st phrase is it?
So I have got this roll of aluminium foil tape from Home Depot. Since I have not been crafting much I thought I would go up and play to calm myself. Make a craft for the day. And this was the result of my play. Of course this is just the first attempt but I rather liked it. Will do a video of it soon.


Close up


The trick to the process is not removing the adhesive backing too soon!
I took a tape and cuttlebugged it. Take care while choosing a folder as the new large folders do not go sideways inside the cuttlebug. You need an opening to feed the long tape through as you keep moving the tape to cuttlebug on a different part. But I wanted this design and it was on the big folder! So I took a craft knife and slit part of the folder near the joints to allow tape to feed through! If you do not want to cut your folder choose a smaller folder! Or skip cuttlebugging altogether :)
Well then I punched a 1 or 1 &1/2" circle (just grabbed the nearest approx sized punch :) ).
Now DO NOT REMOVE THE BACKING ALL THE WAY! DO NOT or you'll end up with a mess!
just remove a little bit at a time allowing the brown paper to fall behind. ( I do not know how to describe this but if I hold the tape with both hands - cupped ie hands in O shape I use the last 3 fingers to unfold the backing as I go - Hope that made any sense but it is so difficult to describe). Fold/Frill one fold and then remove a little more. I got a bit messy towards the end as I removed lots of backing before I tucked it in.  Then i punched a 1" circle of the remaining foil to adhere on the top to cover the middle. Took some alcohol ink - I think ranger's butterscotch! and dabbed it on with a felt strip/piece. Took a button - cut off the shank and popped it on top with glue dot and voila! a flower to embellish a card or layout with! Hope you liked this and can't wait to try your own. You can also use regular foil and maybe punch out some shapes, optionally cuttlebug them and then glue them and stack them! Play with foils! I have some soda cans too which I want to emboss with my knk.


post signature

August 30, 2011

Glitch in the Silhouette studio software

I have the new silhouette deisgner studio and found a glitch. My old GSD files cannot be moved in the MY LIBRARY from one folder to another. Hopefully this will be fixed soon.
I had a slight problem with the print and cut being about half an inch off after the silhouette made a noise and started cutting elsewhere. I tried switching off and moving the carriage back and forth (as advised by silhouette) and calibrating. Also contacted them by email and they sent me an fix - a file - and this fixed the problem. I have to start making videos soon :)


post signature

August 28, 2011

Papyrus Frame

I am going to call this a Papyrus frame


The svg file is available for download under the tab
post signature

August 25, 2011

Never Ending Card!

 Did I tell you that my son was fascinated by stars and he wanted another star card. He wanted it on a never ending card! I made the card on my gypsy long ago in my thebugbytes blog using 3 birds - images ie straight from the nest and the card was featured in their blog. You can check that out at this link - http://www.thebugbytes.com/2010/04/never-ending-card-using-straight-from.html . There is a video there as well to show how I assembled it

Just 1 pic of this


So I decided to do a svg file as well for just the base with no embellishments (file under svg file tab - top menu in the blog). My son wanted it blue and with stars - just that.
But before I post the pics the template/instruction to assemble can be seen from these two images


and


So here is a glimpse of the simple simple card I made using the silhouette (silhouette - just the base file is also available ). Looking at this my elder son wants one too but not blue and not with stars but with saxophone images!


1st turn


2nd turn


Now in the next turn  I could have split the images like in my 3 birds version so that half of image does not show through but I wanted the smile to peek through so next turn


and the next turn brings us back to the 1st image. Hope you make one of these cards. You need a big envelope though as my card was the size 8 x 8 :)

post signature

Stars and Heartborder

My son so loves stars now on his cards. So when I was making some thought why not make an svg file . I also played with heart border - I was inspired by watching a crafting video. The files can be found under svg file tab. I like to keep that sorted and if you want to make something it is easy to go to one download page. Please do leave comments if you like the files and also would love it so much if you can share your projects. I will soon have my never ending card svg file out (gypsy file is already available at thebugbytes) today or tomorrow.
Here are pics of the files


post signature

August 23, 2011

Working with the sketch feature in Silhouette designer studio

The sketch feature is for sure a fun way to get your own patterns in the fly.
But there is a tiny trick to it. You have to have an edge sketch for you to be able to fill the shape with color.
Else without the edge sketch option chosen you will not be able to fill (paint bucket on the first panel
to the right side top of the screen).
Here are pics


post signature

Importing svg files in Silhouette designer Studio

If you get an error saying file is corrupt in silhouette designer studio then the most probable cause is that there is text in the file. So open svg editor and expand text to path and then you can try opening it and the file will most probably open fine.


post signature

A Skullie First Day!!!

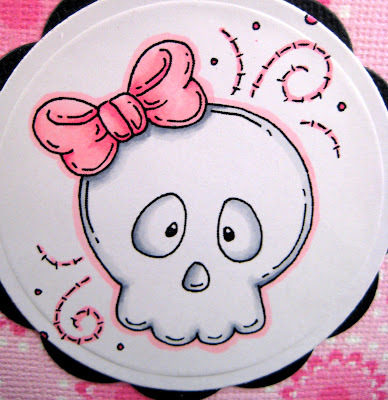
Hi ya everyone!  This is Melissa from Melissa Made!  Thanks so much Pam for letting me share this project.  My daughter goes back to school soon and I wanted to sneak a special treat in her lunch box.  I made this container using her favorite colors!  She's also really loving the goth stuff - so I chose this little Cutie Skull from Meljen's Designs to put on the side.
Once I had the scoring finished, I simply adhered all sides of the carton.  I started with the small flap and placed a small strip of adhesive down the side.
I formed the base of the box by adhering that flap to the inside of the other flap.
I then folded in the bottom and placed adhesive there as well starting with two opposing flaps and then the other two.
Once this was done the rest was easy.  The score lines worked perfectly for forming the top portion of the milk carton.
Next, I printed my Meljen's Designs Cutie Skull out and used the Cuttle Bug to cut and emboss.  For the first cut I used a circle nestable from Spellbinders and taped it to the paper so it wouldn't shift going through the Bug.  I also used the A plate, B plate and the C plate.
I then wanted to emboss the edge of the circle so I ran it through the Cuttle Bug again using an A plate, an embossing mat, three thick pieces of cardstock and two B plates.
This gave me a fabulous embossed edge.
I colored the skull using the following Copics.
I punched wholes in the top and ran some Tulle through and a black and white gingham ribbon.  I LOVE using tulle on my projects and saw this first in this post from Kristy at She's A Sassy Lady!


Thanks for stopping by today!  Please feel free to ask questions and visit my blog for more fun projects!

August 22, 2011

New version of Silhouette Studio 1.9 and also designer studio

Wow! There is a new version of silhouette studio. Be sure to upgrade. And from that you can upgrade for about $50 (49.99) to the designer version.
I upgraded and love the designer version. Features in this (designer and not 1.9) are
You can import svg files (will be in a single layer though)
You also have a sketch option.
To explain more about this sketch feature

you can fill a shape with the above things ie you can add an edge and fill. When you combine with the fill option and line fill options you get pretty cool effects.


edited: Yeah with the designer edition you can add your own patterns. Just open the pattern folder in my library and then drag and drop the folders and the pattern will appear in the fill pattern window. Wow for this alone the dollars are worth spending


Also there is a new rhinestone feature. It has edge fill,  radial fill and linear fill. Also a freehand fill and single fill. Now the 1st 3 fills are good for shapes but nope not good for text even single line ones. You will be better off to freehand trace the shapes on top of the actual text placed as template


Then the rulers are enhanced


And eraser and knife tools are so cool. With erasers you can change the width and shape and with knife - we have various knives - sawtooth , zig zag etc


Have fun and see more info at https://www.silhouetteamerica.com/faq.aspx?topicid=100


post signature

Celebrate


Hi scrappers this is Kate from Sassy and Scrappy and I have a really fun card to share with you today. I know a lot of us struggle with making cards for boys/men and since I needed to make one for a birthday I thought it would be the perfect time to share a few ideas with you.

I find that using primary colors and basic patterns can be the best way to go. For this card I decided I wanted to use a digital image from Some Odd Girl. When it comes to coloring, some people like to choose the paper they want to coordinate with the image first, but in this case I did the opposite. Now that could make things more difficult but I tend to gravitate toward bold colors and patterns so I had plenty in my stash.

In the picture below you can see the colored image and the paper that I chose for my card. For some masculine cards I use more muted tones, but here you can see I really played up the colors.


When choosing colors and patterns it can be difficult at times make a "match", one easy way to get around that is to buy coordinating paper collections. But you can also dig into your stash and compare colors and styles that you like with one another and you may be happily surprised to learn that a lot of brands come together really well. This is what happened to me as I was looking through my paper and embellishments. So I encourage to not be afraid to mix and match.


I wanted to add some texture to the card and the first thing that came to mind was a scallop punch, and to be honest I've been known to use "feminine" items on projects for guys before...and I say there's nothing wrong with that. However for this card I used a notebook edge punch and I think it added a fun touch.


Before I go I want to let you know about an opportunity for you to win a Cricut Imagine! Some of you may have seen the post a couple of weeks ago where I talked about my friend Kymberlee, whose children lost their home and everything in it due to a fire. In order to help raise funds to assist her children my friend is has a special offer.

If you buy ANY size order at https://happinessincluded.scentsy.us/Buy?partyId=49047342 proceeds will be matched by myself and going directly to my daughter. PLUS all orders (any size) will be entered into a drawing for $50 in Scentsy Gift Certificates (2-$25s) good for a future order.

These are flame free candles and are absolutely incredible, I highly recommend them!

And if that weren't enough...

For every donation of $5 you will receive ONE entry (3 entries/$10 and 10 entries/$20) for a

CRICUT IMAGINE Package
with 4 cartridges (Better Together, Best Friends, Snow Angel, Nursery Tails)
2 EXTRA ink cartridges (4 total)
4 EXTRA Mats (5 total)

DONATE VIA PAYPAL using Kymberlee.Lake@yahoo.com
Please post as a GIFT on PAYPAL
If you'd like to learn more about this story or contact Kymberlee personally you can reach her at The Paper Midwife.

August 20, 2011

Star Card

My friend Allison has a challenge group at facebook. I love her challenges and today's challenge was to use a star. So I decided to make a star card. It's a triangle which folds up to a star. I am not still able to go up to my studio but thank heavens for my silhouette sd which is so small and can be easily carried it has been brought downstairs. So with just some glue and paper - here is a star card. I will put up the template - svg file soon on the blog. Note it is a the card base only and not the embellishments. Just resize it to the size you want. You need to do some ungrouping and deleting (text and score marks in case you do not want score marks) and then moving before cutting in that file. Contact me if you need help with the file

Here is the card


post signature