f The Bugbytes: April 2013

Welcome - Copyright & Disclaimer

Welcome to The Bug Bytes a site/blog mainly for Papercrafting and some photography and other stuff thrown in here & there. Add in some die cutting machine, scrapbooking tools, cameras, scissors , glue and...... My name is Pam. If you have been redirected from Papillon Digital Design you have come to the right place.Hope you get inspired by the projects, videos and files. Would love it if you could leave comments and become a follower. (Word verification is turned ON to avoid spam. Sorry for that inconvenience.) Would love it if you would also share your project here . If you find a linky under the post do share your project by posting link there or if you do not find a linky post your link in the comments.Thank you for visiting. The website Papillon digital designs has changed to Papillon Digital Design so if the link gives and error or takes you to page with chinese characters then please drop the 's' in the link at the end of papillondigitaldesigns and try . That is change papillondigitaldesigns to papillondigitaldesign and try the link.

April 30, 2013

DS4J Challenge #66 - Women are special

The theme for challenge 66 at DS4J for the next couple of week until May 14th is Women are special
here is the theme in quotes

THEME : 'Women are Special'. Basically to celebrate Mother's Day, but your card/creation can be for a mother, grandmother, stepmother, or a very special woman friend. In other words, show off the speciality of being a woman and celebrate her.

So make a project to fit the theme preferably with one of the lovely images in store and link it up.
 I have used 2 images
sentiment Mom which can be found at this link


Here is my card


The mesh in the card I had already posted before - http://papillondigitaldesigns.com/2013/04/mesh-card-file.html and finally this is the project I made with it. The file both svg and silhouette is available for download in my blog under the respective tab in main menu.
Isn't the sentiment so cute. Love it. And the anemone borders are lovely too.
I am going to enter the card in some challenges
  1. http://www.sassystudiodesigns.blogspot.com/2013/04/dare-to-be-sassy-thursday-174.html
  2. http://dianamlarson.blogspot.com/2013/04/dlart-thankful-thursday-challenge-108.html
  3. http://paper-craftingjourney.blogspot.co.uk/2013/04/use-sentiment.html
  4. http://shellysimagesblog.blogspot.com/2013/04/ttt-challenge-april-showers-bring-may.html
  5. http://www.inklingsandyarns.com/2013/04/inky-linky-12/
  6. http://thesisterhoodofcrafters.blogspot.com/2013/04/its-free-for-all.html
  7. http://simonsaysstampschallenge.blogspot.com/2013/04/anything-goes.html


post signature

Puppy Kisses

Hi
This is my last week as Guest DT at Alicia's
Really enjoyed coloring up all the lovely images.
The image I used today is called Linda and cute puppy
And here is a card I made using this cutie pies


The paper is DCWV pet stack
I have used copics to color the image
Skin - E000, E00, E11, E13, E09 - Yep I bravely venturing into E09
Hair - E5 family and YR000, YR20, YR21
Green is from YG0 family
Blue is B0 family with a bit of B12 and B14 for darks
Puppy E00 , E25, YR20, YR21

The other puppy die cut is from silhouette store and the sentiment I designed it myself.
Pin was also handmade from the beads and charms I had.
Do keep visiting the site.
Love to read all your sweet comments

post signature

April 26, 2013

Furever friends - Simply B April Challenge

Made a card today for April Simply B Facebook Fan Challenge

The image is given free and you have to make a project following the theme which for this month is swirls and ribbons

Here is mine


I liked how this turned out. One more card shape I like.
The pattern paper are from - recollection elegant and DCWV pet stack.
Image is colored with copics

post signature

April 23, 2013

Sending you Sunshine

Today is  my 3rd Tuesday as guest designer at Alicia's blog.
Thanks Alicia and Lauren for choosing me as a GDT this month.
And this time I have a card with this cute chibi image - Lily


The sun background , mailbox and clouds were cut with silhouette sd. Now I am having quite a lot of problem with silhouette sd after the update which I did recently. Cutting is off so I have to go back and fussy cut it out again. Grr....

I drew on the specs on the sun. Does not come with the image and I made my own sentiment.
I have used copics on the image
Hair - E4 family
Face - E000, E00, E11, E13, E04, E09
Eyes - B00, B12
Envelope - E30, E33
sun - Y13 and Y28
Dress - B00, B02, B12, YG21, YG25

I also inked a doily and added it behind the image. Some bling and a couple of heart stickers and a button sticker for sun completes the card. Ha ha some adhesives of course to make them all stick.
Thank you readers. I appreciate the comments you leave. Fuel to my creative juices they are.
Do be back and share your projects too.


post signature

April 21, 2013

Happy Birthday the Harry Potter way

Yeah I managed to make a 3rd card with Karber image for the Karber Challenge
One of my favorite characters - Harry Potter and this particular Harry potter can be got here - http://www.karberdigital.com/harry-potter/100-harry-potter.html

Had so much fun making this card.


The potion recipe, owl - Hedwig and Hogwarts hat are all from silhouette. The title I wrote it myself - yep handwritten. Lol a shaky hand really helps. The cuts were further embellished with copper and gold gilding liquid. had fun with the ribbon. I had a yellow ribbon which was quite not the color I wanted so handy copics came to help. Then I twisted the 2 ribbons together. Tying to a bow with the twisted ribbon was a bit tough.
I also used a stud ribbon (lol dont know what to call it. Looks like rhinestone ribbon but more like a metal stud or brad)
The red background card stock was embossed with a cuttlebug folder
Let me try to list the copic colors used
Hair - E7 family and E5 family
Wizard coat - W family
Inside grey sweater - C family (for contrast)
Pant - B9 family
I used BG0000 for the glasses
and a little bit of green - one of the YG3 family for eyes.
Scarf - R3 family and Y2 family with E07 for dark
Face -- E000, E00, E11, E09, E13

Again Thanks to Kristy from someodd girls ustream videos I love using E09. Very brave of me :) for it is quite a scary color for face.


Note: Karber has moved. You can find most of the digis at https://www.etsy.com/shop/SweetEscapeDigis/items

April 20, 2013

Embrace Life

This is part of Sunday release at DS4J this week called "Melissa"

And here is a card I made with this cute image


She is colored using copics
The corner dies are cheery lynn dies - deco corner B165
 the butterfly are from spellbinder - positively me jewel flowers and flourishes
and ovals - spellbinder - decorative oval and lacey oval

I used copics to color
E4 family for hair
Face - E0 family and yes for the first time I used E9 - eek but not bad. This is thanks to kristy from someoddgirl ustream videos.
The flowers and lips - R2 family
Other than that I crinkled and colored some seam binding for ribbon, added some bling and some Iam cherry blossoms and leaves.
the sentiment is from justrite stamps

I do want to enter this card in some challenges


  1. http://allsortschallenge.blogspot.com/2013/04/week-203-passion-for-flowers.html
  2. http://papercreatorscrafts.blogspot.co.uk/2013/04/challenge-7.html
  3. http://pumpkinspiceblog.blogspot.co.uk/2013/04/winner-announcement-challenge-16.html
  4. http://crafts4eternity.blogspot.com/2013/04/r120-april-showers-brings-spring-flowers.html
  5. http://www.dillybeanschallenge.blogspot.com/2013/04/dilly-beans-flowers.html
  6. http://blog.docerelashop.com/2013/04/design-team-post-challenge-36-use.html
  7. http://qkrstampede.blogspot.co.uk/2013/04/challenge-35-punches-and-or-dies.html


post signature

Captured

Played with one more image for the Karber Challenge

This time tried a different fold. An accordion fold for base and then mount a card on the 3rd step.
Played with lots of dies which I love . One of my favorite embellishment along with bling and ribbon


I like the way this turned out. Have to add this type of card as a favorite fold along with center step fold.
The accordion base (steps) is an 8 1/2 x 11inch paper scored at 1.5" , 3", 5", 7", 9" so that first step height is 1.5 inch and the other 2 steps are 2 inches high. Added lots of bling.

Note: Karber has moved. You can find most of the digis at https://www.etsy.com/shop/SweetEscapeDigis/items

April 19, 2013

CARD WITH INTEGRATED STAND TUTORIAL

Hello, my friends!  This is Audrey and I'm so happy being back at Pam's sharing a project with you.  Being the sweetheart Pam is, she was very cooperative and sensitive to my needs, allowing me to return after a lengthy but necessary absence -- thank you, Pam!

Today my card project is a card-scraplift I found searching Google and I thought it was pretty cool -- it has it's own stand integrated at the bottom of the card!  Although I'll go step-by-step, you'll see this card is so simple and easy, and the basic card can be cut in just a matter of a few seconds!  Cathy Saxton is noted on Google as the creator of this design and the information I got she created it on a Silhouette.  When I saw her sample it looked simple enough not to need the use of a cutting machine, so anyone can do this with just a few scissor cuts.  It's probably one the easiest cards I've found and I'm going to share with you what I did to recreate Cathy Saxton's idea so you can do your own.
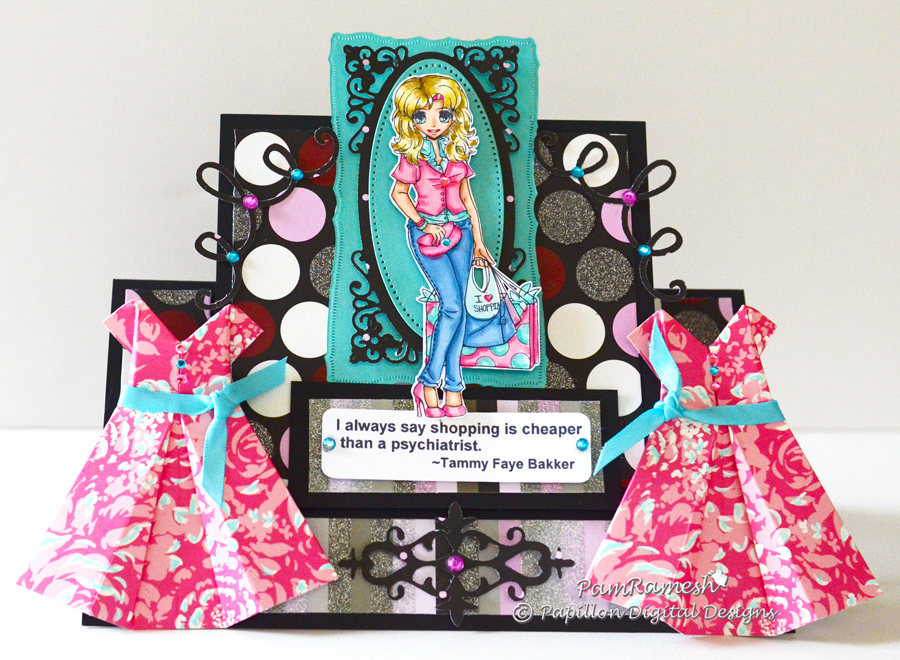
Here's my card:
FRONT VIEW
 
SIDE VIEW 
 
FLAT FOR MAILING 


To construct the card begin with a 4.25" x 11" sheet of cardstock; with the 11" side (lengthwise) across the top of the scoreboard, draw a pencil line at the 1" score mark and then score at 5.75"(I've drawn in lines only to give you a better visual so read carefully as they do not indicate fold, score, and/or cut lines);


Turn paper to have the 5.75" side (widthwise) across the scoreboard; score at 1.50" and 2.75" but only up to the 1" pencil line (this will be the stand at the bottom of the card):


Turn the paper again lengthwise (11" side) and draw a pencil line at 1/2" but only up to the first" score line and then repeat on the other end.  It should look like this:


Next, starting on the 1" line you drew, from each end, cut into the card about 3/8" then cut down to meet the 1/2 line; cut across the 1/2  line but only cut up to the 1.50" (or the 2.75" score line depending on which end you start at); repeat the same on the other end cutting up to the corresponding score line only; now bone-fold the tabs along the score lines to the inside.  Your bottom folds should look like the picture following the note before -- please read it:

IMPORTANT NOTE:  Do not fold the drawn 1" line, or the 1/2" drawn line, or fold down the top tabs at the end of the longer tabs which indicate where the cut for the 3/8" along the 1" line -- these are not fold lines, these lines were drawn for demonstration only for measurement and you'll erase them when you complete the base of your card.


Lastly, fold the score line at the 5.75 score line" (the middle of the card).  Now when you place the top of the card on the bottom stand it will look like this from the front and side:


All done!!!  Don't forget to erase those pencils lines and now you're ready to decorate your card however you please!  Wasn't that easy?!!!  And isn't it cool?!!!

Here's a picture of what my template looks like -- you can use it as a guideline if necessary:


Should you have a question, just visit me at my blog by clicking on my name at the top of this post.  It's been a pleasure being here to share with you, and thank you so much for stopping by!

Hugs and I'll be seeing you -- next month!


April 18, 2013

Sassy Star Fold Card


Hi Everyone

Michelle here from Lady of Leisure Ink - thank you Pam for having me. It's time for another Dare To Be Sassy Thursday over at Sassy Studios, the theme this week is 'Fancy Folds'.  As soon as I saw this challenge I knew exactly what I was going to do, I had seen a beautiful "Star Card" on Pinterest and it was just begging for me to make it.  Here is the card all folded up.


The paper I used for this card is from Authentique stack called 'Renew'.  The embellishments are cut from various dies that I have : Mini Fanciful Flourish (Cheery Lynn Designs), Small Butterfly (Elizabeth Craft Designs) and the flowers are from a small flower punch I have (?Marvy.)  Here is a closer look.


Now for a look at the inside.


The image I used for the inside is France Honey - I just love her!  I used my Silhouette Cameo to print and cut her (also to make the offset) and then coloured her with ProMarkers.


The sentiment I made using my Cameo with a Silhouette Sketch Pen, and a Lettering Delights Thin Font.


Here is the link to the Star Card tutorial.

I hope you will pop on over to Sassy Studios and take a look at all the gorgeous creations from the Design Team.  I hope I have inspired you to join in the challenge and win some of these sassy images for your very own - don't forget if you use a Sassy Studios image you can enter twice.

Thanks again Pam for having me.  Until next time.

Michelle

April 17, 2013

Brightening up the Office

Hi, it's Linda here from TheTulipCollector and I am the guest Designer at Bug Bytes today. I made some décor for the office for my new job.

Everytime we needed to have our patients sign a credit card slip, we gave them a pad of post it notes to put under the slip. Real classy! So the Dr bought a mini clipboard. PERFECT! But plain and ugly. She asked me to class it up a bit with my creativity. Our office colors are shades of purples, lavenders, pinks and olive and celery green. I couldn't just stop with the clipboard...I had to make a matching pen! The swirls are from Cricut Cartridge Sophisticated in a glossy black cardstock. I found these beautiful silk flowers at the Dollar Store and got several to use for stuff around the office. The ribbons on the top are a mix of raffia, sheer ribbons, grosgrain ribbons and satin ribbons.
 
I couldn't stop there. We have deep tissue massages and the current packages save you $12.50. I suggested that we have buy 5 get 6 and that we could sell more since that saves $50. With Mothers Day coming up it would be a nice gift! The Peacock is from Cricut Cartridge Art Nouveau. The flowers and the butterflies are from MyCreativeTime Flower Petal Dies and Chunky Jar Accessories. The Black letters are from Chip Décor, the word Massage is from Sophisticated and the pink letters are from Nates' ABCs. I liked the way the peacock coordinated with the peacock tail printed paper. Here is my poster advertising this:
 

April 16, 2013

DS4J CHALLENGE # 65 – Bling on a shape

This week the challenge at Digistamps4joy is Bling on a shape

 THEME : 'Bling on a Shape'. To Make an easel shaped card (plain or twisted), and ADD BLING somewhere on the card.

I chose to make a twisted circle easel card using this adorable image from the DS4J store called - Country bride 


Now to make the twisted circle it is way simple and here is a picture which will help


Isn't that self explanatory 
Now do make a card and join us for the challenge.
I do want to enter this card in some challenges


post signature

Shopping is a great therapy

Lol  my hubby will probably - ha ha - not probably but definitely NOT agree with this sentiment.
But I am sure a majority of women will agree with me though and some men too.

This month I am a guest designer at Alicia's and this is my 2nd project and this time with this lovely cutie called Shopping Girl

It's a center step fold card and I am beginning to love this card. Using the full 8 1/2 x 11 sheet to make the card gives lots of real estate ( the folds/steps are 1 1/2" wide so lots of room in the center)


The pattern papers (except for the dress itself) is from DCWV - Dress it up
The center label dies are from spellbinder
the swirls are from life craft. Except for spellbinders which I get from amazon the other dies usually memory box, cheery lynn, life crafts etc I get from Darlene. She is such a sweet lady.
The dress is from Anna griffin's embellishments set. I got the set way back and since I don't have girls was thinking of where to use then and lo behold a perfect opportunity for this card :). Some bling and some bows and o course the perfect sentiment :) and there you go a card.
Now do drop in at Alicia's and check out the other cards by the designer's and do check out the lovely cute digis at Alicia's Shop
post signature

April 15, 2013

Cards, Cards, Cards

Hello everyone, it's Danita from danitasdesigns.blogspot.com.

It's been a very busy month for me so far, weddings, birthdays, taxes (ugh!!).  I needed some "me" time so for my DT post this month I decided to go back to my first crafting love....cards!!  Yes, I truly love making cards. It relaxes me.  I hope you enjoy them.
  Missing You
I made this one for my brother that I haven't seen in a while.
DCWV - All Dressed Up cardstock
Cricut Cartridge - Surburbia
Anniversary Card for my Husband
He spoiled my surprise by coming into my craft room and going through my cards!!!  This is something he never does!! He said he just wanted to see what I'd been working on.  I was so upset because this will be our first anniversary apart (going to Mania with his blessings) and I wanted to surprise him. Oh well, I guess I better come up with a Plan B!!

Graphic 45 - A Proper Gentleman cardstock ( I'm really starting to like Graphic 45)
Cricut Cartridge - Surburbia
Party Invitation Card
I designed this card with my Silhouette Software for my husband's aunt.       I had to make 40 of these.
Wassau Metallics Paper Purple Shimmer
 Pocket Cards
I bought a Sizzix pocket die off of a Face book group for a really good price. I've always wanted this die, so when it posted, I nabbed it!!!  I had so much fun making these.                                                                                             Don't be surprised if you see a lot of pocket cards in the future.
Hello Pocket Card
Holly Robinson Peete Craft Paper
Flower-Wood Veneer colored with Copics

Friendship Pocket Card
I made this for a friend. I hope she doesn't see this before it arrives at her home!
Bazzil Basic Smooth Cardstock
Cuttlebug Embossing folder - Bandana
Martha Stewart Branch Punch

Another Friendship Card.
Wassau Metallics Paper - Pink Shimmer
Cuttlebug Embossing folder - Bandana
Martha Stewart Branch Punch

April 14, 2013

Large Birthday Book Card

Hi Crafty Friends!!
Adele Here from Adele's Creation's

Today is my DT day 
Thanks Pam for having me again this month :)

For my project to share with you all, I decided to share my Silhouette cut Book Card
This card is for my Niece who is soon to turn 40


Although I used the Cameo for this to cut, it can be cut on the SD/CraftRobo too

I used the basic file I shared with you a while back but with the addition of the lattice oval's on the front cover

Here is what the file contains 


Inside I used the Print N Cut method for my insert on the back cover, the file I will share has the pattern but no actual sentiment, so you can type your own :)

If you would like this Book Card Studio file, you can get it HERE

Thank you for stopping by today
See you all next month :)

Happy Crafting

Hugs

Adele

April 13, 2013

Open Wide!


This fun fun image is released this Sunday (south africa - time zone) too at DS4J and when you see the image you will see why I call it fun.
He is called "Big Mouth".


Now I used my friend's Desire's favorite card shape :) the center step card
The background pattern paper is from DCWV I think safari kids. Not sure - one of their animal stacks and the pink hippo is from that too.
I used copics to color and chalk box chalk ink to ink the edges.
I of course want to post this in some challenges 
  1. http://chalknstock.blogspot.com/2013/04/april-challenge.html
  2. http://delightfulsketches.blogspot.com/2013/04/weekly-challenge-round-up.html
  3. http://brownsugarchallenge.blogspot.com/2013/04/challenge-37-step-or-easel-card.html
  4. http://stempelsonne.blogspot.com/2013/04/86-vom-0504-180413.html
  5. http://thesisterhoodofcrafters.blogspot.com/2013/04/animal-antics.html
  6. http://emeraldfaeries.blogspot.co.uk/2013/04/challenge-42-recipe.html
  7. http://www.craftdoormagazine.com/2013/04/ttcrd-april-9th-april-15th-challenge.html


post signature